Table of Contents
ToggleConverting a cramped, awkward bathroom into a functional wet room might sound like a plumber’s pipe dream, but it’s one of the smartest renovations for tight quarters. A wet room eliminates the bulky shower enclosure and tub combo that dominates most small bathrooms, replacing them with an open, walk-in shower area where the entire floor slopes gently toward a drain. The result? A bathroom that feels twice its actual size, stays cleaner with fewer grout joints and seams, and delivers that high-end hotel vibe without the corresponding square footage. Whether working with a 5×7-foot powder room or a narrow en-suite, homeowners can achieve a surprisingly luxurious space with careful planning and the right waterproofing strategy.
Key Takeaways
- A small space wet room bathroom eliminates bulky tubs and enclosures, making tight quarters feel twice as large while delivering a luxurious, spa-like appearance.
- Proper waterproofing with sheet or liquid membranes is non-negotiable; a 24-hour flood test before tiling catches costly mistakes and is required by many building codes.
- Wet room floors must slope at least 1/4 inch per foot toward the drain to prevent standing water, with pre-sloped shower pans simplifying installation for DIYers.
- Porcelain tile with a COF rating of 0.6 or higher, wall-mounted fixtures, and large-format tiles with narrow grout joints create a modern, minimalist aesthetic that maximizes visual space.
- A small space wet room remodel typically costs $4,000–$8,000 for DIY projects or $10,000–$18,000 with contractor labor, with the biggest savings coming from DIY demolition and choosing mid-grade porcelain tile.
- Building permits and professional waterproofing inspections are essential; this protects resale value, ensures insurance coverage, and keeps your bathroom renovation code-compliant.
What Is a Wet Room Bathroom and Why It’s Perfect for Small Spaces
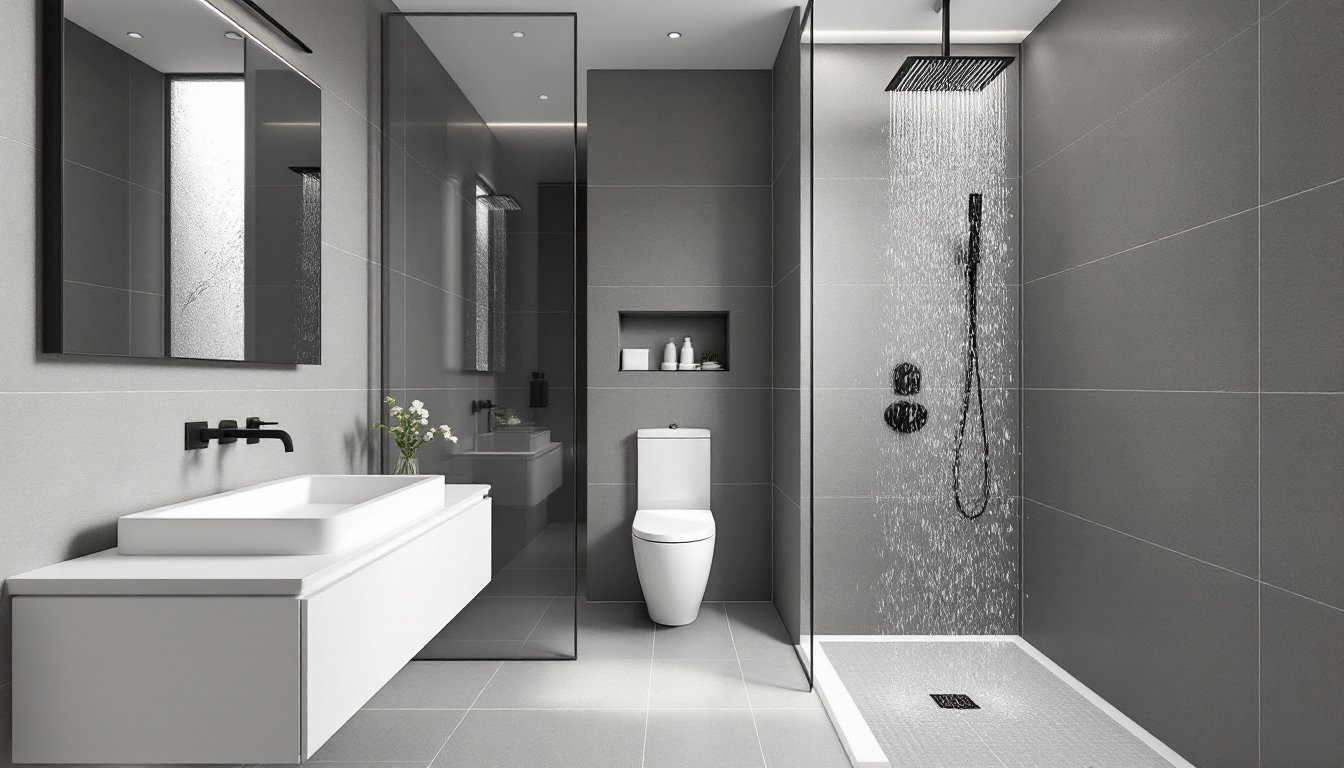
A wet room is a fully waterproofed bathroom where the shower area isn’t cordoned off by a traditional enclosure or curb. Instead, the entire floor is waterproofed and sloped to a single drain (or multiple drains), allowing water to flow freely without pooling. Think of it as one big shower stall with a toilet and vanity inside.
This concept originated in Scandinavia and Japan, where bathing spaces were designed for efficient water use and easy maintenance. In North America, wet rooms have gained traction in small condos, aging-in-place renovations, and modern minimalist builds.
The appeal in tight spaces is straightforward: removing the shower door, curb, and tub instantly reclaims visual and physical space. A standard 60-inch tub and surround can eat up 15 square feet. A wet room uses the same footprint but feels open and continuous. There’s no barrier to stub your toe on, no swinging door to navigate, and no enclosed shower stall trapping steam and mildew.
Key Design Benefits of Wet Rooms in Compact Bathrooms
Beyond the obvious space savings, wet rooms offer several practical advantages that make them especially attractive for DIYers tackling bathroom upgrades.
Visual continuity: Floor-to-ceiling tile (or large-format panels) with minimal grout lines creates an unbroken sight line. This tricks the eye into perceiving more square footage.
Accessibility: No threshold to step over means wet rooms meet ADA guidelines for zero-entry showers. They’re ideal for aging homeowners or anyone with mobility concerns.
Easier cleaning: Fewer seams, corners, and enclosures mean fewer places for soap scum and mold to hide. A squeegee and quick spray-down after each shower keeps surfaces pristine.
Improved ventilation: Open layouts allow steam to dissipate faster, reducing moisture buildup that leads to mildew. Pair this with a properly sized exhaust fan (minimum 50 CFM for bathrooms under 50 square feet, per HUD standards) for best results.
Resale appeal: Buyers appreciate modern, spa-like finishes. A well-executed wet room signals quality construction and thoughtful design, especially in urban markets where space is premium.
Essential Planning and Layout Considerations
Planning a wet room isn’t just about ripping out the tub and calling it done. Structural and code considerations come first.
Floor joists and structural support: Most residential floors are built to handle standard bathroom loads, but wet rooms add concentrated weight from thick mortar beds, waterproofing membranes, and tile. For second-floor installations, verify that joists can support the additional dead load, typically around 30-40 pounds per square foot. Sistering joists or adding blocking may be necessary.
Slope and drainage: The floor must slope at least 1/4 inch per foot toward the drain to prevent standing water. In a 5×8-foot wet room, that means the highest point could be 1 to 1.5 inches above the drain. This slope is built into the mortar bed or pre-sloped shower pan. Linear drains (like Schluter KERDI-LINE) are popular because they allow for a single-direction slope, making tile installation simpler.
Plumbing and drain location: The drain should ideally sit in the shower zone, not under the toilet. Moving a drain often requires cutting floor joists and rerouting waste lines, work that needs a permit in most jurisdictions and may require a licensed plumber.
Electrical and lighting: GFCI-protected outlets are required within six feet of any water source per NEC Article 406.9. Recessed LED fixtures rated for wet locations (IP65 or higher) keep the ceiling clean. Avoid pendant lights or anything that hangs into the spray zone.
Waterproofing and Drainage Requirements
Waterproofing is non-negotiable. A wet room demands a continuous waterproof membrane from floor to walls, with careful detailing at transitions and penetrations.
Membrane systems: Two main types dominate the market. Sheet membranes (like Schluter KERDI or Wedi board) are polyethylene-based and bond directly to cement board or foam substrates. Liquid membranes (such as RedGard or Aqua Defense) are troweled or rolled onto surfaces and cure to form a seamless barrier. Sheet systems are faster and more foolproof for DIYers: liquid membranes require precise thickness and multiple coats.
Substrate prep: Walls should be sheathed in cement board (Durock, HardieBacker) or foam board (Wedi, Kerdi-Board), never moisture-resistant drywall (green board), which will eventually fail in continuous wet conditions. Seams between boards must be taped and thinset before membrane application.
Floor pan: A pre-sloped shower pan (mortar bed or foam) sits atop the subfloor. The waterproof membrane goes over the pan, lapping up the walls at least 6 inches above the highest water line (typically 72 inches for showerheads). Corners and drain connections are sealed with prefabricated corners and clamping rings per manufacturer specs.
Testing: Before tiling, perform a flood test. Dam the drain, fill the floor pan with 2 inches of water, and let it sit for 24 hours. Check the ceiling below (or crawl space) for leaks. This step is required by many building codes and catches mistakes before they’re locked behind tile.
Permits: Most municipalities classify wet room construction as a major bathroom remodel, requiring a building permit and inspections for framing, plumbing, and waterproofing. Check local code before starting, pulling a permit protects resale value and insurance coverage.
Smart Material Choices for Durability and Style
Material selection in a wet room balances aesthetics, slip resistance, and long-term durability.
Floor tile: Porcelain or ceramic with a matte or textured finish provides the best traction when wet. Look for a coefficient of friction (COF) rating of 0.6 or higher (DCOF AcuTest per ANSI A137.1). Large-format tiles (12×24 inches or bigger) minimize grout lines but require precise installation to maintain slope. Smaller mosaics (2×2 or hexagon) conform more easily to sloped floors and offer excellent grip.
Wall tile: Porcelain, ceramic, or natural stone work well. Many designers use the same tile on floors and walls to create a seamless look inspired by small space living ideas. Avoid highly polished marble or glass on floors, it’s treacherous when wet.
Grout and sealers: Use epoxy grout for floors and any high-traffic areas. It resists staining and mildew far better than traditional cement grout. For walls, a high-quality cement grout with a penetrating sealer (applied annually) suffices. Keep grout joints narrow (1/16 to 1/8 inch) for a modern look and easier cleaning.
Fixtures and hardware: Wall-mounted toilets and floating vanities keep the floor clear for drainage and simplify mopping. Brushed nickel or matte black finishes hide water spots better than polished chrome. Choose a thermostatic shower valve to prevent temperature swings and potential scalding when water pressure fluctuates.
Glass partials (optional): A single fixed glass panel, often 36 to 48 inches wide, can shield the toilet and vanity from direct spray without closing off the space. Use 3/8-inch tempered glass with minimal hardware for a nearly invisible barrier.
Space-Maximizing Design Ideas and Features
Smart layout and fixture choices can stretch a small wet room’s functionality.
Corner or linear drains: Placing the drain in a rear corner or along one wall (linear drain) frees up more usable floor space and simplifies the slope. Linear drains also create a modern, spa-like aesthetic that resonates with home design inspiration trends.
Recessed niches: Carve out wall niches (16 inches wide by 12 inches tall is common) between studs for shampoo and soap storage. Tile the interior and add a waterproof LED strip for dramatic accent lighting.
Wall-mounted everything: Toilet, vanity, faucets, and even towel bars should float. This keeps sight lines open and makes floor cleaning effortless. Verify wall framing can handle the load, toilets require solid blocking behind the drywall.
Monochromatic palettes: Light grays, soft whites, and warm beiges reflect light and expand perceived space. Reserve bold accent tiles for a single feature wall or niche.
Frameless mirrors: A large, edge-to-edge mirror above the vanity doubles the visual depth. Skip ornate frames that chop up wall space.
Compact fixtures: A 24-inch wall-hung vanity and a wall-mounted toilet with a concealed tank can save 12-18 inches compared to standard floor-mount models. That extra space makes a 5×7-foot room feel almost generous.
Budget Estimates and Cost-Saving Tips
Wet room costs vary widely based on materials, labor, and regional pricing. Here’s a rough breakdown for a 5×8-foot (40 square feet) bathroom in a mid-range U.S. market as of early 2026.
Demolition and prep: $500–$1,200 (DIY demo can cut this to near zero, but disposal fees and dumpster rental still apply).
Waterproofing system: $600–$1,500 for membrane, drain assembly, and mortar bed materials. Sheet membrane kits (Schluter or Wedi) run $800–$1,200 for 40 square feet.
Tile and setting materials: $800–$3,000 depending on tile choice. Budget porcelain is $2–$5 per square foot: designer mosaics or natural stone can hit $15–$30 per square foot. Add $300–$600 for thinset, grout, and sealers.
Fixtures and fittings: $800–$2,500. A basic wall-mount toilet, vanity, faucet, and thermostatic shower valve kit lands around $1,200: upgrade to designer brands and you’ll double that.
Plumbing and electrical: $1,500–$3,500 if hiring pros. Moving drains, rerouting supply lines, and upgrading electrical panels (for heated floors or high-wattage exhaust fans) add cost.
Labor (if not DIY): $3,000–$8,000 for tile setting, plumbing, and finish work.
Total DIY estimate: $4,000–$8,000. Total contractor-led project: $10,000–$18,000.
Cost-saving strategies:
- Do your own demo and prep. Ripping out old fixtures and tile is labor-intensive but doesn’t require specialized skills. Wear safety goggles, gloves, and a respirator to protect against silica dust and mold.
- Use a pre-sloped foam shower pan. Products like Wedi Fundo or Schluter KERDI-SHOWER-KIT eliminate the need for traditional mortar beds and speed installation.
- Choose mid-grade porcelain tile. Quality has improved dramatically: $4–$7 per square foot tiles often look indistinguishable from $15 designer options once installed.
- DIY the tiling if you’re comfortable. Wet room tile work is more forgiving than you’d think, the slope is built into the pan, and small-format tiles hide minor layout errors. Rent a tile saw ($50–$70 per day) instead of buying one.
- Skip the glass partition. If the layout allows, a well-placed showerhead and sloped floor can keep spray contained. Add a shower curtain on a ceiling track as a temporary solution and upgrade later.
- Shop salvage or surplus stores. Floor-model vanities, overstock tile, and discontinued fixtures can slash material costs by 30–50 percent.
Be realistic about skill level. Waterproofing and plumbing are the two areas where mistakes are expensive. If you’ve never soldered copper or installed a shower pan, hire a pro for those tasks and handle demolition, tiling, and finish work yourself.