Table of Contents
ToggleSmall bathrooms demand creative thinking. When floor space is measured in inches rather than feet, every fixture counts. A space saving bathroom vanity can transform a cramped powder room or half-bath into a functional, organized space without sacrificing storage or style. Whether dealing with a 5×7-foot bathroom or retrofitting a narrow guest bath, the right vanity makes the difference between clutter and calm. This guide walks through practical solutions, installation considerations, and storage strategies that actually work in tight quarters.
Key Takeaways
- A space saving bathroom vanity solves cramped bathroom challenges by providing functional storage while maintaining code-compliant clearance and creating a sense of spaciousness through exposed flooring.
- Wall-mounted, corner, and pedestal designs offer flexible solutions for different bathroom layouts, with depths of 12-18 inches and widths from 18-36 inches fitting most compact spaces.
- Maximize storage in small bathroom vanities using vertical organization strategies like drawer stacking, lazy Susans, over-door organizers, and recessed medicine cabinets rather than horizontal expansion.
- Proper installation requires locating wall studs, using heavy-duty mounting hardware rated for 100+ pounds, maintaining level surfaces, and ensuring correct P-trap alignment to prevent plumbing failures.
- Select vanities with water-resistant materials like thermofoil or marine-grade plywood, integrated sinks, soft-close drawers, and durable joinery to ensure longevity in high-humidity bathroom environments.
- Most vanity replacements take 3-6 hours to install, but verify local permit requirements before starting work, especially if rerouting plumbing or electrical lines.
Why Space Saving Vanities Are Essential for Modern Bathrooms
Housing trends tell the story: homes built after 2010 often feature smaller secondary bathrooms. The average half-bath now measures around 20-30 square feet, leaving minimal room for a standard 60-inch double vanity. Even primary bathrooms in condos and townhomes increasingly prioritize open floor plans over sprawling fixture layouts.
A compact vanity addresses several practical challenges. It creates clearance for door swings, critical in narrow spaces where building codes require a minimum 21 inches from the front edge of fixtures to any wall or obstruction (check local IRC requirements, as dimensions vary). It also opens sightlines, making small rooms feel less cramped.
Beyond code compliance, smaller vanities suit modern lifestyles. Guest bathrooms need function, not luxury square footage. Powder rooms near entryways benefit from streamlined fixtures that don’t dominate the space. Even in primary baths, wall-mounted or corner units can free up floor area for storage towers or hampers, which many households prioritize when optimizing small-space layouts.
Types of Space Saving Bathroom Vanities
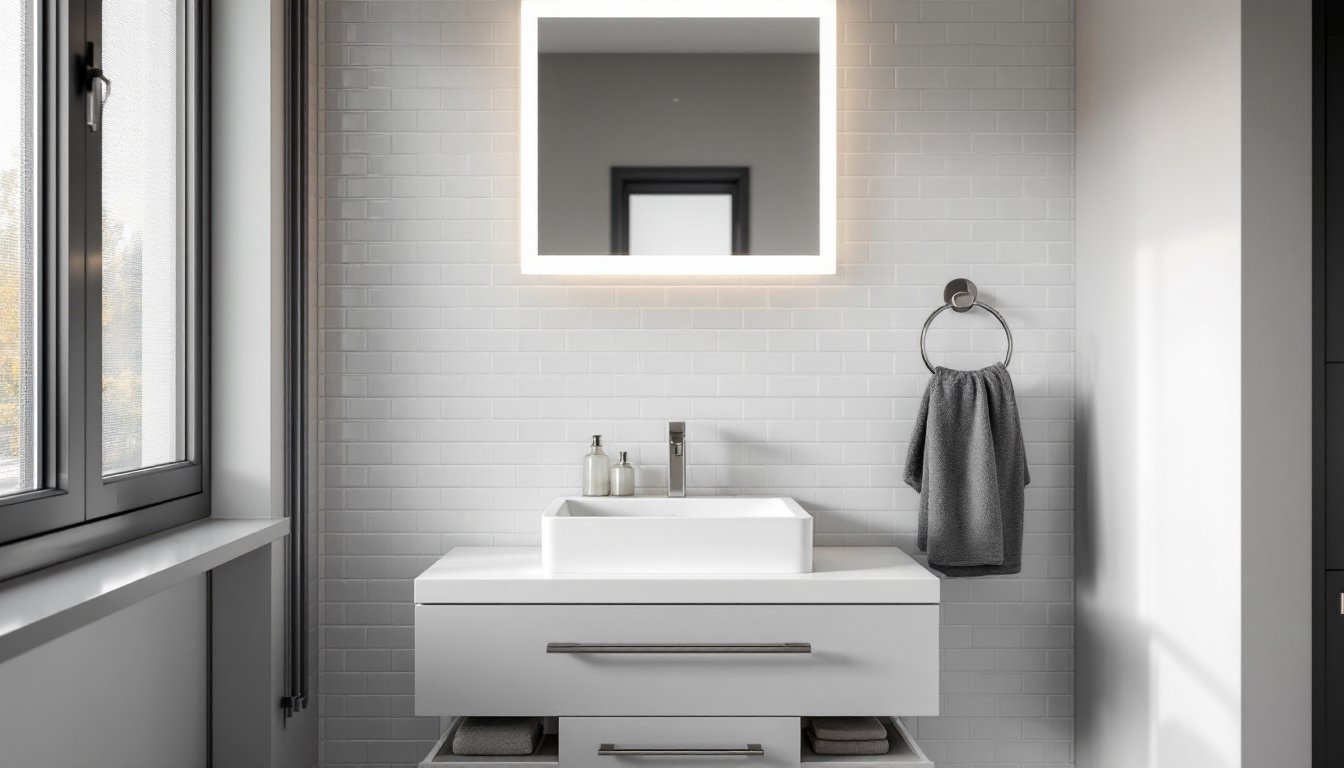
Wall-Mounted and Floating Vanities
Wall-mounted vanities attach directly to studs, leaving floor space visible underneath. This design creates a visual trick: exposed flooring makes the room appear larger. Functionally, it simplifies cleaning, no base to work around.
Typical depths run 12 to 18 inches, compared to 21 inches for standard vanities. Widths range from 18 to 36 inches, suitable for single-sink setups. Installation requires locating studs (usually 16 inches on center) and mounting to a 2×6 or 2×8 backer board installed during framing, or securing with heavy-duty toggle bolts rated for the vanity’s weight plus countertop and sink (often 100+ pounds when loaded).
Floating vanities often include drawer storage rather than cabinet doors, maximizing usable interior volume. Soft-close drawer slides prevent slamming in tight quarters. Some models integrate towel bars or open shelving below the countertop, adding function without bulk.
Safety note: If retrofitting an existing wall without backer board reinforcement, consult a contractor. Drywall anchors alone won’t support long-term loads, and failure can damage plumbing lines hidden behind the wall.
Corner Vanities and Pedestal Designs
Corner vanities use dead space where two walls meet. Units typically measure 24 to 30 inches per side, forming a triangle or L-shape footprint. They work well in powder rooms where the sink can sit at an angle, freeing the center of the room.
Pedestal sinks technically aren’t vanities, but modern pedestal designs now include semi-pedestal or half-pedestal configurations. These mount the basin to the wall with a shroud covering the drain lines, leaving a gap underneath for a slim basket or stool. Storage is minimal, so they suit guest baths or situations where a medicine cabinet and linen closet handle the bulk of organization.
Corner vanities sometimes pair with triangular mirrors and matching shelving units to maintain visual cohesion. Just as compact furniture for living areas emphasizes multifunctional design, corner bathroom fixtures maximize awkward angles that standard cabinets can’t address.
Key Features to Look for in a Compact Vanity
Drawer dividers and pull-out organizers matter more in small vanities. With limited cabinet volume, every inch counts. Look for units with built-in compartments for toiletries, or plan to add aftermarket drawer inserts.
Countertop overhang affects usability. A vanity with minimal overhang (1 inch or less) saves space but makes cleaning harder and offers no lip to contain spills. A 2-3 inch overhang provides a practical edge without eating too much floor area.
Integrated sinks (where the sink and countertop are one piece) eliminate the gap around undermount or drop-in sinks. They’re easier to clean and often lighter, reducing wall load for floating installations. Materials include molded cultured marble, solid surface composites, and vitreous china. Porcelain-enameled steel is budget-friendly but chips easily.
Finish durability matters in high-humidity environments. Water-resistant materials like thermofoil, marine-grade plywood with waterproof veneers, or solid wood with multiple coats of polyurethane hold up better than particleboard. Check that drawer boxes use dovetail or dowel joints, not staples.
Plumbing compatibility can’t be ignored. Wall-mounted vanities require concealed drain lines and P-traps that fit within the wall cavity (typically 3.5 inches deep for standard 2×4 framing). If the existing plumbing sits too far forward, expect to reroute lines, a job often requiring a licensed plumber and a permit.
Towel bar placement also deserves thought. Some compact vanities include side-mounted towel rings or hooks, keeping hand towels within reach without adding a separate wall fixture. In a powder room where wall space is tight, this small detail prevents awkward reaches or towels landing on the floor.
How to Maximize Storage in a Small Bathroom Vanity
Start with vertical space. Drawer stacking (shallow top drawer for daily items, deeper lower drawer for backstock) beats a single large cabinet. If the vanity has cabinet doors, add a tension rod inside to hang spray bottles or cleaning cloths.
Lazy Susans work in corner vanity cabinets, making items at the back accessible without digging. Choose models with raised edges to prevent bottles from sliding off during rotation.
Over-the-door organizers aren’t just for bedroom closets. A slim pocket organizer mounted inside a vanity door holds brushes, razors, or makeup without taking up shelf space. Magnetic strips (the kind used for knife storage) can attach to the inside of a metal vanity frame, holding tweezers, nail clippers, and other small metal tools.
Under-sink areas in pedestal or wall-mounted designs remain tricky. Freestanding tiered shelving units (often marketed for kitchens) fit around P-traps and provide two or three levels of storage. Measure the clear space carefully, most P-trap assemblies sit 6-8 inches from the back wall and rise about 10 inches from the floor.
Medicine cabinets recessed into the wall add storage without protruding into the room. Standard depth matches a 2×4 stud bay (3.5 inches). Installing one requires cutting drywall and potentially relocating electrical if a light fixture occupies the space. Avoid cutting into load-bearing headers above windows or doors.
Similar to strategies used with dining furniture in cramped kitchens, layering storage solutions vertically rather than horizontally keeps the footprint small while maintaining capacity. A vanity paired with a tall, narrow linen tower (12-18 inches wide) often outperforms a wider vanity alone.
Installation Tips for DIY Homeowners
Pre-installation prep prevents headaches. Shut off water at the fixture shutoff valves (usually beneath the existing sink) or at the main if no local shutoffs exist. Have a bucket and towels ready, residual water in supply lines will drain when connections are broken.
Measure twice, cut once. Mark stud locations with painter’s tape before mounting a wall-hung vanity. Use a stud finder to confirm: don’t rely on knocking alone, especially in older homes with irregular framing. If studs don’t align with the vanity’s mounting bracket, install a horizontal ledger board (a 1×4 or 2×4 spanning multiple studs) as a backer.
Level and plumb matter. Even a slight tilt causes water to pool on the countertop or drain sluggishly. Use a 4-foot level during installation. Shim as needed between the wall and the vanity back, then trim shims flush with a utility knife after securing the unit.
For wall-mounted vanities, typical mounting height places the countertop at 32-36 inches from the finished floor (ADA-compliant height is 34 inches max to the countertop). Taller users may prefer the upper end of that range: households with children might go lower. Once height is set, drill pilot holes through the mounting bracket into studs using a 3/16-inch bit, then drive 3-inch cabinet screws (not drywall screws, they’re too brittle).
Plumbing connections vary by vanity type. Vessel sinks (bowls that sit on top of the countertop) require wall-mounted or tall deck-mounted faucets with sufficient clearance. Undermount sinks need the faucet mounted in the countertop or wall. If switching sink styles during a bathroom upgrade project, existing faucet holes may not align. Escutcheon plates or deck plates can cover extra holes, but check compatibility before purchasing.
P-trap alignment causes more rookie mistakes than any other plumbing step. The tailpiece (the straight pipe extending down from the sink drain) must align with the trap arm (the horizontal pipe in the wall). If heights don’t match, use an adjustable P-trap or a tailpiece extension. Hand-tighten slip nuts first, check for leaks with water running, then snug with slip-joint pliers, not a pipe wrench, which can crack plastic threads.
PPE reminder: Wear safety goggles when cutting tile or drilling overhead, gloves when handling plumbing (old traps may harbor bacteria), and a dust mask if sanding or cutting drywall. Bathrooms are small: ventilation is poor. If using sealants or adhesives, open a window and run a fan.
Permit requirements vary widely. In many jurisdictions, replacing a vanity (like-for-like swap) doesn’t require a permit. Rerouting drain or supply lines usually does. Moving electrical for a new light fixture may also trigger inspection requirements. Check with your local building department before starting work: unpermitted work can complicate home sales or insurance claims.
Many homeowners find that practical space-saving principles used elsewhere in the home apply equally to bathroom fixtures. The same logic that drives compact closet systems or multi-use furniture works here: prioritize function, measure carefully, and invest in quality hardware. Wall-mounted designs, for instance, often benefit from the same innovative storage thinking used in bedroom furniture.
Tool alternatives: A drill/driver is essential for mounting brackets. A basin wrench makes faucet installation far easier in tight spaces (standard wrenches can’t reach behind the sink deck). If the existing vanity is built-in, a reciprocating saw speeds demolition, but a hacksaw and pry bar work if power tools aren’t available. For cutting countertops (if trimming a prefab laminate top), a circular saw with a fine-tooth blade works, but a jigsaw offers more control in tight corners.
Wall-mounted sinks and vanities are gaining popularity, especially in guest bathrooms where design flexibility matters. Platforms like Houzz showcase thousands of small-bath remodels, offering visual inspiration for different configurations. Homeowners can also explore curated collections of wall-mounted fixtures to see how professional designers approach limited square footage.
Installation typically takes 3-6 hours for a straightforward swap (removing an old vanity and installing a similar-sized replacement with no plumbing modifications). Budget a full day if rerouting lines, patching drywall, or installing blocking for a floating vanity. If tile work or electrical updates are involved, add time accordingly.
Finally, don’t skip the caulk. Run a bead of silicone caulk (not latex, it mildews in damp environments) along the back edge where the vanity meets the wall, and around the sink rim if it’s a drop-in style. Tool the bead smooth with a wet finger or caulk tool within a few minutes of application. This seal prevents water intrusion, which can rot framing or loosen adhesive over time.